Pages

Friday, July 29, 2011

50 Watt Amplifier

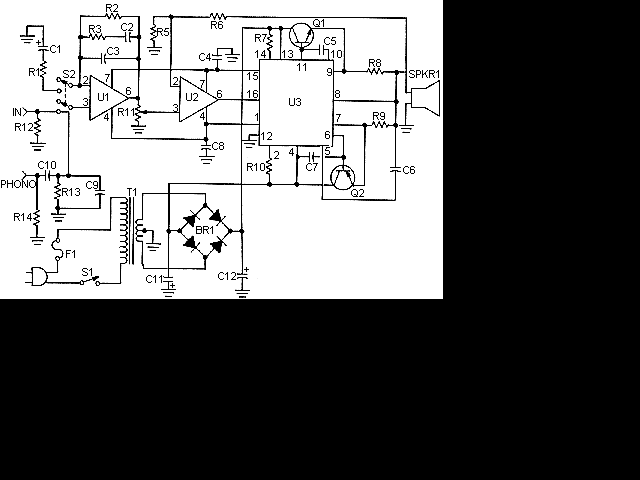
This is a handy, easy to build general purpose 50 watt amp. The amp has an input for a radio, TV, stereo or other line level device. It also has a phono input for a record player, guitar, microphone or other un-amplified source. With the addition of a low pass filter at the input, it makes a great amp for a small subwoofer.
This is the schematic of the 50 Watt Amp
Parts

R1(1)200 Ohm 1/4 W Resistor
R2(1)200K 1/4 W Resistor
R3(1)30K 1/4 W Resistor
R5(1)1K 1/4 W Resistor
R6(1)5K 1/4 W Resistor
R7,R10(2)1 Meg (5%) 1/2 W Resistor
R8,R9(2)0.4 Ohm 5 W Resistor
R11(1)10K Pot
R12,R13(2)51K 1/4 W Resistor
R14(1)47K 1/4 W Resistor
C1(1)100uF 35V Electrolytic Capacitor
C2(1)0.011uF Capacitor
C3(1)3750pF Capacitor
C4,C6(2)1000pF Capacitor
C5,C7,C8(3)0.001uF Capacitor
C9(1)50pF Capacitor
C10(1)0.3uF Capacitor
C11,C12(2)10,000uF 50V Electrolytic Capacitor
U1,U2(2)741 Op Amp
U3(1)ICL8063 Audio Amp Transister Driver thingy
Q1(1)2N3055 NPN Power Transistor
Q2(1)2N3791 PNP Power Transistor
BR1(1)250 V 6 Amp Bridge Rectifier
T1(1)50V Center Tapped 5 Amp Transformer
S1(1)SPST 3 Amp Switch
S2(1)DPDT Switch
F1(1)2 Amp Fuse
SPKR1(1)8 Ohm 50W Speaker
MISC(1)Case, Knobs, Line Cord, Binding Posts Or Phono Plugs (For Input And Output), Heatsinks For Q1 And Q2

  1. I know I skipped R4. That is not a problem :-)

  2. Distortion is less than 0.1% up to 100HZ and increases to about 1% at 20kHz.

  3. I haven't been able to find anyone who sells a suitable T1. You can always use two 24V 5A units in series. If you are building two amps (for stereo), then I would suggest using an old microwave transformer and rewinding it. Follow the instructions in the 12V To 120V Inverter, execpt wind 26 turns, twist a loop (center tap) and wind 26 more turns. That should work out to around 50 volts. You may need to add or remove turns depending on your transformer.

  4. Q1 and Q2 will require heatsinks.

  5. You may have trouble finding U3 because it is discontinued. Please don't email me about sources...I can't find it either. See if any of the sources in Where To Get Parts has it. A possible source was sent in by JBWilliams

Tuesday, July 19, 2011

easy and reliable amp

voice_amplifier_small

Headphone monitor amp


This simple amplifier is ideal for adding a headphone jack to equipment that lacks this feature. The Headphone Buffer circuit board is small enough (1.2" X 1.4") to squeeze into even the smallest spaces and power requirements are so low that existing supplies in retrofitted gear can be used. It's a useful addition to many PAiA products such as the Submixer or Submix-Master. Adding a headphone output turns a Stack-In-a-Box it into an incredible practice amp. 
The key component is the 5532 Dual OpAmp. While ordinarily this part is chosen for it's low noise characteristics, it is also capable of delivering nearly 350mW of output power per side, more than enough to drive headphones. The circuit can operate from bipolar voltages from +/-5V to +/-18V and it is not absolutely necessary that the + and - supply voltages be the same magnitude. The superior supply voltage rejection of the IC allows operation with unregulated supplies.
In the typical mono application such as adding headphones to a FatMan or Theremax, the Left and Right inputs of the amp are both connected to the Volume control supplied with the kit. For stereo applications a dual ganged pot should be used and this modification is covered in the instructions.
The Headphone Buffer amp kit includes circuit board, all electronic components, 1/4" Stereo Jack, Volume control w/knob, wire and assembly instructions.

Two Transistors Audio Amplifier

22 Watt Stereo Amplifier

Wednesday, July 13, 2011

Rain Detector

This circuit uses a sensor made of a small piece of etched PC board and a simple SCR circuit to detect rain and sound a buzzer. The SCR could also be used to activate a relay, turn on a lamp, or send a signal to a security system.

Parts


R1(1)1K 1/4 W Resistor
R2(1)680 Ohm 1/4 W Resistor
D1(1)1N4001 Silicon Diode
BZ1(1)12V Buzzer
S1(1)SPST Switch
SCR1(1)C106B1 SCR 106CY
SENSOR(1)See Notes
MISC(1)Board, Wire, Case, PC Board (For Sensor)


Notes

  1. The sensor is a small piece of PC board etched to the pattern showen in the schematic. The traces should be very close to each other, but never touching. A large spiral pattern would also work.

  2. Make sure to use a loud buzzer.

Monday, July 11, 2011

Mini-MosFet Audio Amplifier

Notes
This project was a sort of challenge: designing an audio amplifier capable of delivering a decent output power with a minimum parts count, without sacrificing quality.
The Power Amplifier section employs only three transistors and a handful of resistors and capacitors in a shunt feedback configuration but can deliver more than 18W into 8 Ohm with <0.08% THD @ 1KHz at the onset of clipping (0.04% @ 1W - 1KHz and 0.02% @ 1W - 10KHz) and up to 30W into a 4 Ohm load.
To obtain such a performance and to ensure overall stability of this very simple circuitry, a suitable regulated dc power supply is mandatory. This is not a snag because it also helps in keeping noise and hum of the preamp to very low levels and guarantees a predictable output power into different load impedances. Finally, as the amplifier requires only a single rail supply, a very good dc voltage regulator capable of supplying more than 2 Amps @ 40V can be implemented with a few parts also.


Saturday, July 9, 2011

Interior light extender


1. Mount components to the PCB from the PLAIN SIDE.  Polarity must be observed for DI, (Power Diode) and for CI (Electrolytic Capacitor).
(i) DI - Band on Diode is at K (-ve) end
(ii) CI - Arrow on Body of Capacitor points down the negative leg.
Push the component legs through, nip off 1-2mm clear of the bus-bars and bend leg's in opposite directions. This will hold the components in place.
2. TI (BC558) should be mounted with the flat section in the direction shown.
3. T2 can be mounted as follows:
(1)  Turn the end of a piece of link wire to a ring and solder together. This ring is attached to a hole in the transistor body by a 1/2 x 1/8" Metal thread screw. The link wire is cut and soldered at B1 - B6.
(2) The legs on the transistor are too large to fit into the holes in the Veroboard so solder short lengths of link wire to the transistor legs and solder these to the PCB.
4. Solder electrical wire from Kit to 12V + and 12V - positions.
5. To wire to automobile circuit, the following procedure is recommended.
(a) Locate the wire from the Interior Bulb to the switch activiated by the car door.
(b) Determine that the car has a Positive Earth or Negative Earth Wiring system by checking the battery. (Most cars use negative earth).
(c) For Negative Earth System join the 12V +ve wire from your project to the wire from bulb to switch using the wire-tap from the Kit. For Positive Earth system join 12V -ve wire instead.

(d) Ensure that the cover on the wire-tap is folded into place so that no bare metal is exposed.
(e) Join the 12V -ve wire from your project to a suitable earth point on the car body. (For Positive Earth system read 12V +ve).
NOTE: Do not cut existing wiring to the interior light just join the project in parallel with the switch.
(f) Test the unit for correct function.
TROUBLE SHOOTING
(i)  Check for dry joints, joints not soldered at all, or solder bridging PCB tracks.
(ii)  Check polarity of D1 (Diode) C1 (Electrolytic Capacitor) T1 BC558 PNP Transistor and T2 2N3055 NPN Transistor must be mounted as shown in diagram.
(iii) Check locations of all components.
Technology Notes
All modern cars are fitted with door-switch operated courtesy lights. Useful devices, but not quite as useful as they might be because they are so arranged that the light is extinguished as soon as you close the door - just when you need light to find the ignition switch. do up your seat belt etc. How much better if the internal light stayed on for a few seconds after the door is closed.  This little project does just that. It provides a four-second delay (approx) after which the interior light slowly dims - being finally extinguished after 10 or 12 seconds.  The unit is very simple to construct and once tested and properly insulated it may be wired across one of the car door switches.  In operation, after a short delay the lights will gradually dim until they are completely extinguished. There is no battery drain in the off-state as the unit only operates during the delay period after the door is closed.
Most car door switches am simply simglec-pole switches. with one side earthed.  When the door is opened the switch earths the other line thus completing the Light circuit.
In a car whem the negative terminal of the battery is connected to the chassis the nerative wire of the unit (emitter of Q2) is connected to the chassis and the positive wire (case of 2N3055) Is connected to the wire going to the switch.  In. a car having a positive earth system this connection sequence is reversed.
When the switch closwe (door open) C1 is discharged via DI to zero rolts and when the switch opens, C1 charges up via R1 and R2. Transistors QI and Q2 are connected as an emitter follower (Q2 just buffers Q1) therefore the yoltage across Q2 increases slowly as C1 charges.  Hence Q2 acts Like a low resistance in pars1lel with the switch - keeping the lights on.
The value of C1 is chosen such that a useful light level is obtained for about four seconds, thereafter the light decreases until in about 10 seconds it is out completely.  With different transistor gains and with variation to current drain due to a particular type of car the timing may be simply adjusted by selecting C1.


15W mono car amplifier using TA7227P


source

Build a good Audio Buffer Amplifier


General Description:
This circuit will amplify voice audio in the range of 50 to 10,000 cycles with little distortion, and have the ability to drive a low impedance load to 16 ohms.  The circuit will run from 6 to 15 vdc and give about 20 dB of gain.
Concept:
To build an inexpensive audio amplifier with little parts count that is very reliable and easy to build and implement. Parts are available from Radio Shack.
Construction:
Build the circuit on a breadboard and use a socket so when the lightning hits, well you know......
If the audio input is biased above ground (audio floats on a voltage) a coupling cap will need installed in the "Audio In" lead to the pot.  The pot can be any value from 5 K to 100 K.  The 100 pF helps eliminate RF bombardment, making it suitable for higher RF environments. Don't forget the 100 uF cap or the circuit will oscillate.
Many op-amp circuits don't drive low impedance loads well, this circuit will handle a load impedance to about 16 ohms but doesn't need to be loaded down to that impedance.  The output cap is a 10 uF non polarized electrolytic for impedance's to 600 ohms.  The output capacitance should be raised to 100 uF for impedance's to 100 ohms and to 1000 uf for impedance's below 100 ohms (speaker.)
Operating bandwidth is from 50 cycles to 10 kc.  Over 10 kc and the unit suffers from poor slew rate, causing distortion, but for NBFM this bandwidth is acceptable.  Actually, for this purpose slew rate limitations work to our advantage as it helps make the amplifier less RF susceptible.  Increased audio amplification can also be had with the addition of a feedback loop.  Consult the RS parts substitution manual for examples.
source

Friday, July 8, 2011

Miniature Loop Alarm

A few months ago, I decided to build a compact, yet effective alarm. My demands were:- simple construction, reliable operation, very small power consumption, and, most of all, small size. I started with CMOS logic gates, but was soon forced to abandon the concept after a few unsuccessful (and far too complicated) attempts. Then I suddenly realized that a simple transistor switch might do the job and I was right.
As you can clearly see from the schematics, the circuit is utterly primitive and consists of two identical transistor switches. Each has its own alarm LED and they're coupled to a neat 82dB buzzer. The two 1N4148 diodes are used to prevent a signal from one sensor from triggering both LEDs. The sensors used are either wire loops or normally closed reed switches or even a combination of both. You could, for example, tie a wire loop to your suitcase and place a reed switch to the door of your hotel room.
Since this little alarm is intended to be kept in arms reach at all times, there aren't any provisions for automatic shutdown after a certain period of time. The buzzer will sound until you turn the whole circuit off or connect the wire loop back to the jumpers. The same goes for the two LEDs, each indicating its own zone.
Construction is not critical and there aren't any traps for the novice. The two 100n capacitors aren't really necessary, I just included them to make sure that there is no noise interference coming from the long wire loops. For transistors, you can use any NPN general-purpose audio amplifiers/switches (BC 107/108/109, BC 237/238, 2N2222, 2N3904...). Assemble the circuit on perf board. Together with the buzzer and a 9V battery, it should easily fit in a pocket-sized plastic box smaller than a pack of cigarettes. A fresh battery should suffice for weeks of continuous operation.

2W Audio Amplifier using BD139 and BD140 transistors

A 2 Watt audio amplifier made from discrete components.

Notes
This was one of the earliest circuits that I ever designed and built, in Spring 1982. At that time I had only an analogue meter and a calculator to work with. Although not perfect, this amplifier does have a wide frequency response, low harmonic distortion about 3%, and is capable of driving an 8 ohm speaker to output levels of around 5 watts with slightly higher distortion. Any power supply in the range 12 to 18 Volts DC may be used. 

Circuit
The amplifier operates in Class AB mode; the single 470R preset resistor, PR1 controls the quiescent current flowing through the BD139/140 complimentary output transistors. Adjustment here, is a trade-off between low distortion and low quiescent current. Typically, under quiescent conditions, current is about 15 mA rising to 150 mA with a 50 mV input signal. The frequency response is shown below and is flat from 20Hz to 100kHz:


source

Inertia sensor

source

Modular Burglar Alarm

This circuit features automatic Exit and Entry delays and a timed Bell Cut-off. It has provision for both normally-closed and normally-open contacts, and a 24-hour Personal Attack/Tamper zone. It is connected permanently to the 12-volt supply and its operation is "enabled" by opening SW1. By using the expansion modules, you can add as many zones as you require; some or all of which may be the inertia (shock) sensor type. All the green LEDs should be lighting before you open SW1. You then have up to about a minute to leave the building. As you do so, the Buzzer will sound. It should stop sounding when you shut the door behind you. This indicates that the Exit/Entry loop has been successfully restored within the time allowed.

When you re-enter the building you have up to about a minute to move SW1 to the off position. If SW1 is not switched off in time, the relay will energise and sound the main bell. It will ring for up to about 40 minutes. But it can be turned off at any time by SW1. The "Instant" zone has no Entry Delay. If you don't want to use N/O switches, leave out R8, C8 and Q2; and fit a link between Led 3 and C7. The 24 Hour PA/Tamper protection is provided by the SCR/Thyristor. If any of the switches in the N/C loop is opened, R11 will trigger the SCR and the bell will ring. In this case the bell has no time limit. Once the loop is closed again, the SCR may be reset by pressing SW2 and temporarily interrupting the current flow. The basic circuit will be satisfactory in many situations.
However, it's much easier to find a fault when the alarm is divided into zones and the control panel can remember which zone has caused the activation. The expansion modules are designed to do this. Although they will work with the existing instant zone, they are intended to replace it. When a zone is activated, its red LED will light and remain lit until the reset button is pressed. All the modules can share a single reset button. 


source

Sun - Up Alarm


The Sun - Up Alarm can be used to provide a audible alarm for when the sun comes up or it can be used in a dark area and detect when a light comes on. It can also be used to detect a light beam, headlights etc. The circuit works as follows. The phototransistor is very sensitive to light. (Any phototransistor will work fine) The sun shining on this device will provide a high to one of the NAND gates. This will cause another NAND gate to oscillate which will drive another gate to output a 100hz tone. The transistor provides drive for the speaker.

Thursday, July 7, 2011

LASER Power Supply

If you have ever worked with lasers, you know how fun and interesting it can be, you also know how expensive it can be. The high voltage power supplies for the laser tubes are often more expensive then the tubes themselves. This supply can be built with commmon parts, most of which you probably already have in your junk box. The secret is the transformer used. It is a common 9V 1A unit, connected backwards for step up.
Parts


R1(1)10 Ohm 10W Or Greater Resistor
R2(1)Ballast Resistor, See "Notes"
D1, D2, D3(3)1N4007 Silicon Diode
C1, C2, C3(3)0.1 uF 2000V Capacitor
T1(1)9V 1A Transformer
S1(1)115V 2A SPST Switch
MISC(1)Case, Wire, Binding Posts (for output), Line Cord


Notes

  1. T1 is an ordinary 9V 1A transformer connected backwards for step up.
  2. R1 MUST be installed on a LARGE heatsink. A good heatsink is the metal case the supply is built in.
  3. R2 Protects the laser tube from excess current. It should be soldered directly to the anode terminal on the tube. To find R2, start with a 500K 10W resistor and work down until the tube lights and remains stable.
  4. If you have trouble with the tube not starting easily, use a longer anode lead that is wrapped around the tube.
  5. Depending on the transformer you use, the circuit may or may not work. I cannot guarantee the operation of this circuit. Build at your own risk. Some transformers contain very few secondary windings which will quickly saturate the core and basically act like a direct short. The more secondary windings (that is, primary in this circuit) the better.

Tuesday, July 5, 2011

Car Battery Charger circuit fast

This charger will quickly and easily charge most any lead acid battery. The charger delivers full current until the current drawn by the battery falls to 150 mA. At this time, a lower voltage is applied to finish off and keep from over charging. When the battery is fully charged, the circuit switches off and lights a LED, telling you that the cycle has finished.
Parts


R1 1 500 Ohm 1/4 W Resistor
R2 1 3K 1/4 W Resistor
R3 1 1K 1/4 W Resistor
R4 1 15 Ohm 1/4 W Resistor
R5 1 230 Ohm 1/4 W Resistor
R6 1 15K 1/4 W Resistor
R7 1 0.2 Ohm 10 W Resistor
C1 1 0.1uF 25V Ceramic Capacitor
C2 1 1uF 25V Electrolytic Capacitor
C3 1 1000pF 25V Ceramic Capacitor
D1 1 1N457 Diode
Q1 1 2N2905 PNP Transistor
U1 1 LM350 Regulator
U2 1 LM301A Op Amp
S1 1 Normally Open Push Button Switch
MISC 1 Wire, Board, Heatsink For U1, Case, Binding Posts or Alligator Clips For Output


Notes
  1. The circuit was meant to be powered by a power supply, which is why there is no transformer, rectifier, or filter capacitors on the schematic. There is no reason why you cannot add these.
  2. A heatsink will be needed for U1.
  3. To use the circuit, hook it up to a power supply/plug it in. Then, connect the battery to be charged to the output terminals. All you have to do now is push S1 (the "Start" switch), and wait for the circuit to finish.
  4. If you want to use the charger without having to provide an external power supply, use the following circuit.
2nd circuit (power supply)
Parts

C1 1 6800uF 25V Electrolytic Capcitor
T1 1 3A 15V Transformer
BR1 1 5A 50V Bridge Rectifier 10A 50V Bridge Rectifier
S1 1 5A SPST Switch
F1 1 4A 250V Fuse

  1. The first time you use the circuit, you should check up on it every once and a while to make sure that it is working properly and the battery is not being over charged.